I would assume that you already installed Ubuntu as native or perhaps via an image or virtual machine and that you are ready to install SYBASE at this time.
Note: I am using x64 bit architecture if you are using x32 bit adjust accordingly.
1. Download SYBASE ASE 16 from sybase or you can download it here.
2. Lets install the pre - requisites.
sudo apt-get install libaio1
3. Lets adjust the shared memory for sybase to use
sudo nano /etc/sysctl.conf
4. Paste the below at the very bottom
kernel.shmmax = 300000000
5. Apply the changes.
/sbin/sysctl -p
6. Create the installation directory.
sudo mkdir /opt/sybase
7. Change permissions
chmod u+x /opt/sybase
8. Extract the file on the created directory
tar xvf ase160_linuxx86-64.tgz -C /ase160_linuxx86-64.tgz /opt/sybase
9. Go to that folder and begin the installation.
cd /opt/sybase/
chmod u+x ./setup.bin
./setup.bin -i console
10. I selected Typical Install but you can customize as you wish, the important packages for learning purposes are included on the typical install but you may want to exclude Backup Server, XP Server, Job Scheduler etc. and the rest are port and password configurations. Make sure to take note of the passwords and ports especially for the sa account which you will use later to login.
11. You may get an error with the Sample Databases creation but ignore that and we will install it manually.
12. You may want to start ASE upon login so let's prepare a startup script, but if not and you want to start it manually then ignore this step.
sudo nano /etc/init.d/sybase
13. Copy and Paste this script
#!/bin/sh
#
# Startup script for Sybase ASE
#
# description: Sybase Adaptive Server Enterprise
# is a SQL database server.
# processname: dataserver
SYBASE=/opt/sybase
SERVER=`hostname`
USER=`whoami`
# Source environment variables.
. /opt/sybase/SYBASE.sh
# Find the name of the script
NAME=`basename $0`
SU=su
start() {
SYBASE_START=$"Starting ${NAME} service: "
$SU $USER -c ". $SYBASE/SYBASE.sh; $SYBASE/$SYBASE_ASE/install/startserver \
-f $SYBASE/$SYBASE_ASE/install/RUN_${SERVER} > /dev/null"
ret=$?
if [ $ret -eq 0 ]
then
echo "$SYBASE_START Success."
else
echo "$SYBASE_START Failed!"
exit 1
fi
}
stop() {
echo -n $"Stopping ${NAME} service: "
$SU $USER -c ". $SYBASE/SYBASE.sh; isql -S $SERVER -U sa -P '' < \
$SYBASE/$SYBASE_ASE/upgrade/shutdown.sql > /dev/null"
ret=$?
if [ $ret -eq 0 ]
then
echo "Success."
else
echo "Failed!"
exit 1
fi
}
restart() {
stop
start
}
case "$1" in
start)
start
;;
stop)
stop
;;
restart)
restart
;;
*)
echo $"Usage: $0 {start|stop|restart}"
exit 1
esac
exit 0
Note: Common errors are those with variable paths e.g. $SYBASE and $SYBASE_ASE try using absolute path like /opt/sybase/ASE-16_0/install/startserver etc.
14. Save the script.
15. Commands to START, STOP and RESTART ASE
/etc/init.d/sybase start
/etc/init.d/sybase stop
/etc/init.d/sybase restart
16. Lets install the Sample Databases PUBS2 and PUBS3 in case the creation failed during installation.
16.1 Login to the database:
Note: You have to execute this 1 by 1 and not all at once.
You need to change the your_password
(this is the password you use during setup) and your_hostname too.
You can type hostname on terminal to get the hostname.
. /opt/sybase/SYBASE.sh
isql64 -Usa -Pyour_password -Syour_hostname -i $SYBASE/$SYBASE_ASE/scripts/installpubs2
isql64 -Usa -Pyour_password -Syour_hostname -i $SYBASE/$SYBASE_ASE/scripts/installpix2
isql64 -Usa -Pyour_password -Syour_hostname -i $SYBASE/$SYBASE_ASE/scripts/installpubs2
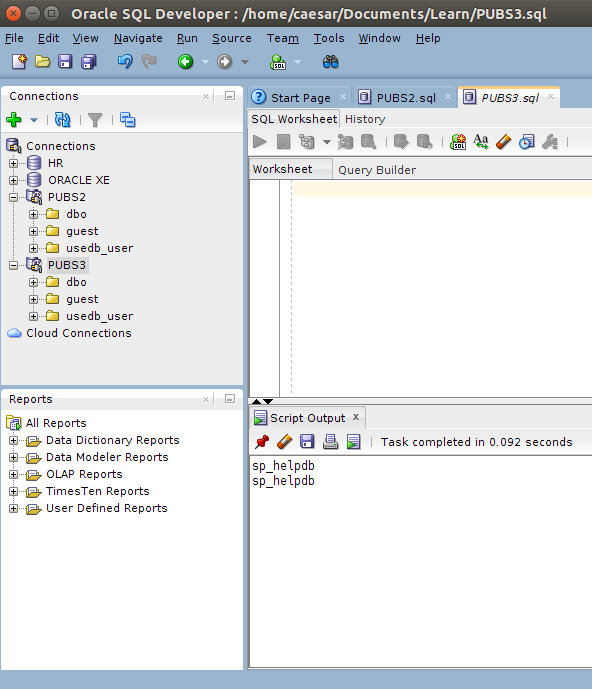
17. Not comfortable with isql? You can use a GUI like the free Oracle SQL Developer with limitations or Aqua Data Studio (not free) and expensive.
Here is a great and working guide that can help you install Oracle SQL Developer on UBUNTU
18. Now that's for Oracle but we are dealing with SYBASE here are you nuts?! Nope you can install a third party driver to be able to connect to SYBASE here it is jTDS - SQL Server and Sybase JDBC driver
19. Extract the zip file
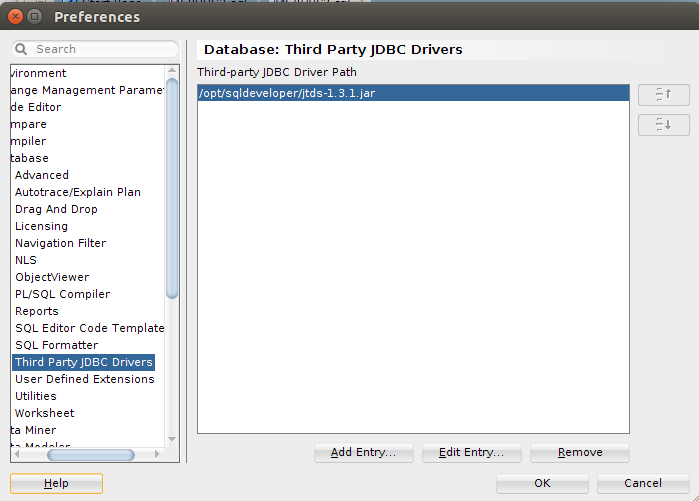
19.1 Go to Tools > Preferences > Database > Third Party JDBC Drivers

19.2 Click on Add Entry and locate the jar file (jtds.1.3.1.jar) then click OK

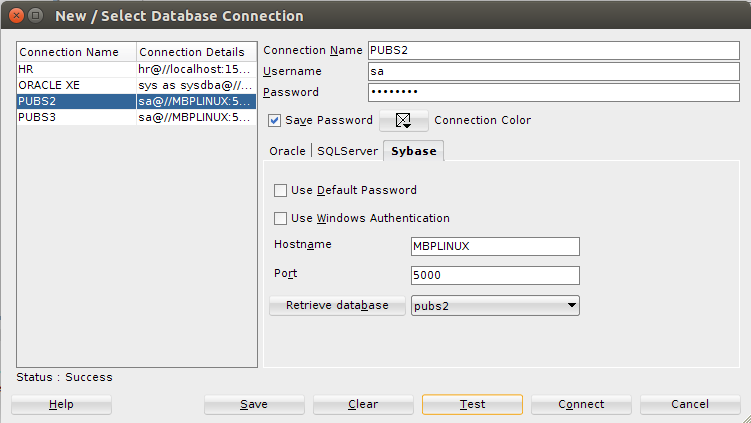
20.2 Configure your ASE Database

If you have any questions I'd be Happy to Help just leave your comments below!


0 comments:
Post a Comment